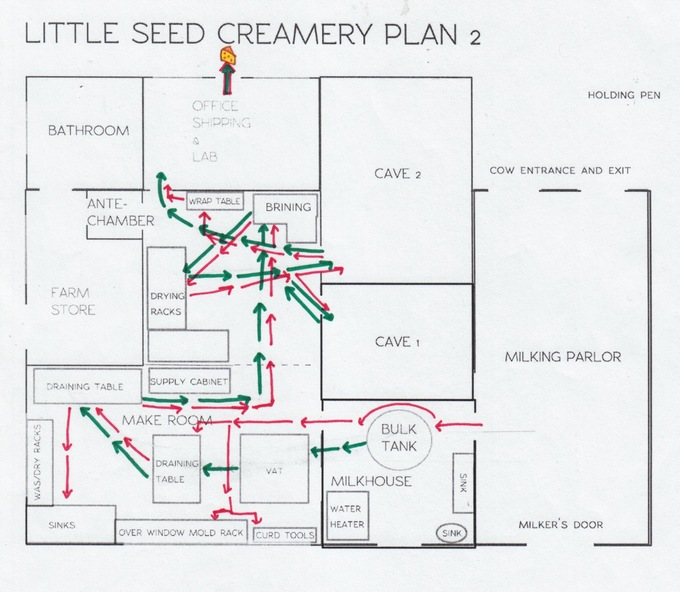
 Milk Flow in green + Work Flow in red = cheese for all at the end!As we get closer and closer to the next milestone of closing on our farm, we’ve been tailoring our to-do timeline (it’s a long one!) and sussing out what to focus our energy on next. One of the biggest projects on the horizon is planning and building our creamery. We dove in at the middle of September armed with books and photos from visits to actual small scale creameries. Since then we have tweaked the design several times as a result of learning of a better practice and additional knowledge of the land it may be built on.
 I've learned that one of the most important concepts to keep in mind while planning any structure is flow. The two most important “flows” I’ve been focusing on for our creamery are Milk Flow and Work Flow. Visualizing and mapping flow is an easy (and free) tool anyone can use to aide in their creamery design, or any other building for that matter.
Just imagine yourself or, in this case, your dairy's milk, flowing through the building and take note of the path it will take from when it first enters, to when it leaves.
Our milk flow would be as follows:
Milk from the parlor to the bulk tank, from the bulk tank to the vat, from the vat to the draining table as curds, from the draining table to the drying room and brine tanks as cheese, from drying and brining to the aging caves, and finally from the caves to the packing room before leaving the farm. That flow should have the happy ending of ending up in the belly of someone with a big smile on their face!
Our work flow, or the flow of the cheesemaker, would be as follows:
Cheesemaker enters the bulk tank room, moves from bulk tank room to make room, moves within make room between vat and draining tables, moves from make room to drying and brining room, moves from drying and brining to aging caves, moves from caves to packing room. Hopefully that flow will end up with me on an Adirondack chair munching on a nice wedge of farmstead cheese with Scrapple!
After you have noted the path of your important flows, map them out on your design. It may seem like an obvious step, but to be honest, I was already a few days deep into our 2nd design before I thought of getting out some markers and actually plotting the path on paper! I can guarantee you that even a person like myself who has made a career out of their imagination will notice intricacies they didn't "see" when walking the flow in their head. Just take a look at my flow map! It looks like I'm dancing the Pizzica in the brine room!
As you can see, these two flows shadow each other at times - this is natural for this process as the milk and the cheesemaker “flow” together (through different doors at times). The important thing to watch out for is backtracking, or retracing steps, in the flow. It’s inefficient and also jeopardizes sanitation and product quality. If I’m walking through the make room with some cheeses fresh from the cave I may release unwanted molds or bacteria into that environment. If I have fresh cheeses draining in molds in the make room, they could come into contact with those elements. I’ve found it helpful to think a bit obsessively about potential contamination to make sure I have everything covered.
With the flows mapped out, it's pretty apparent that there is still more tweaking to do! As you can see, there's a lot going on in the Brining/Drying room. The design I'm working on now will take that into account and attempt to even out the traffic. One way to do this woud be to add a hallway, or to make the building more of a rectangle rather than a square and have work and milk flow from one end to the other. I've also neglected to make a room for the water heater and any electronic devices we'll need so I need to add that as well. We'll keep you posted as the design evolves.
See anything else I've missed or have any suggestions? Please, pass 'em on!

