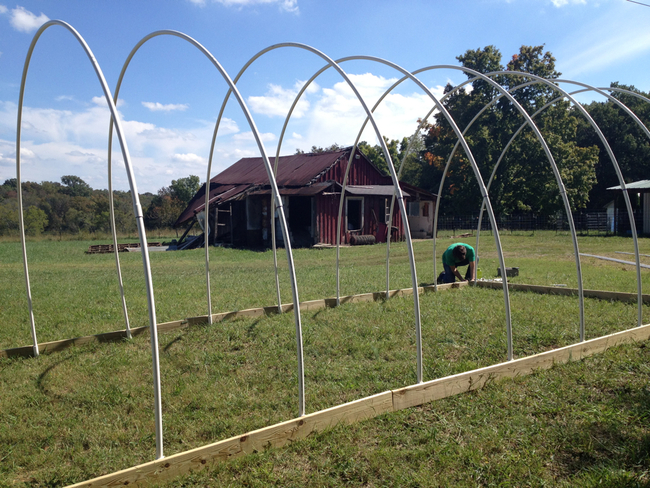
 Attaching the hoops. Old red barn in the background.
We're remodeling an old red barn that was used for milking cows in the 1970's and 80's. It's been abandoned since then and was infested with termites, brown recluse spiders, and who knows what else (actually, I know everything else that was in there, but the list is way too long).
The old milking barn was our hay and lumber storage. We recently decided to transform the barn into a small creamery/classroom space/milking parlor. Over the next few months I'm working with Sweetbreads' step-father to fix up the old building. Good thing he knows what he's doing...
With all that going on we needed somewhere to put all of our hay. We couldn't afford to put up a nice, big hay barn, so we sought out an economical solution. What we found was a $500 hoop house. All of our materials were bought new (except for some screws and a few 2x4's). If you have access to free PVC or plastic covering you could build this thing for next to nothing.
The most common use for a hoop house is as a green house. However, with an opaque film (instead of clear) it could function well for hay storage, or any other kind of storage. At least that's what we hope. So far it's done great through a couple storms. We'll see when tornado season rolls around... We don't have a heavy snow load around here, but if you live in an area that does I'm not sure this design would work too well for you. You'd have to research that further.
I found plans online from a variety of different sources. The two I ended up referencing the most were http://www.hightunnels.org/ and a "How-To" from New Mexico State. A neighbor told me Mother Earth News also has an article on this type of structure, although I haven't read it. In the end I kind of went with my own plans, but those two gave me the best frame of reference.
The Basics of Hoop House Construction
The "hoops" are made of PVC and a plastic film stretches across the top. There's a wood frame at the base and PVC hoops are inserted into PVC sleeves that are hammered into the ground directly inside of the wood frame. It's very simple. Two people can easily build one in a day or two, even if you're as construction-disabled as we are.
I started by building a 12' by 30' wooden frame. This gave me the basic layout. Then I hammered 1.25" PVC sleeves 1.5' into the ground, leaving 6 inches above ground. Each side got eleven sleeves, for a total of 22.
For the hoops I took eleven 20' lengths of 1" PVC and added on 5' to each of them (by cutting 10' lengths in half). That means each hoop was 25' long. I took the hoops and inserted them into the sleeves, making sure only 6" went into the sleeve. Then I screwed the sleeve, the hoops and the wood frame together using exterior grade screws.
To pound the sleeves into our soil the best method was to drop a cinder block on it. We tried large sledge hammers, small sledge hammers, holding 2x4's over the sleeve, not holding 2x4's over the sleeve, and on and on. As rudimentary as it seems, dropping a heavy cinder block did the trick. One warning though, pounding with a sledge hammer is much easier than lifting and dropping a cinder block over and over again, so if you want the "easier on the body" method, just use a sledge hammer. Be careful not to split the PVC though.
The hoops are all attached to each other by three 30' purlins. One at the ridge and one on either side located halfway up to the ridge. This provides an increased level of structural integrity and really makes a huge difference. I wouldn't consider building it without the purlins.
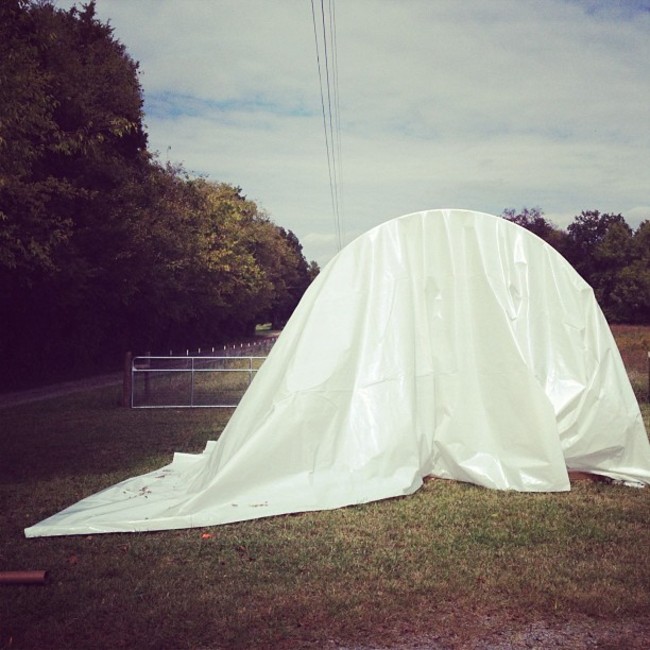
Next we pulled over a huge piece of plastic that I ordered from Farmtek (I think it was 40'x25') and we used some furring strips to sandwich the plastic to the frame.
 The hoops house with plastic freshly pulled
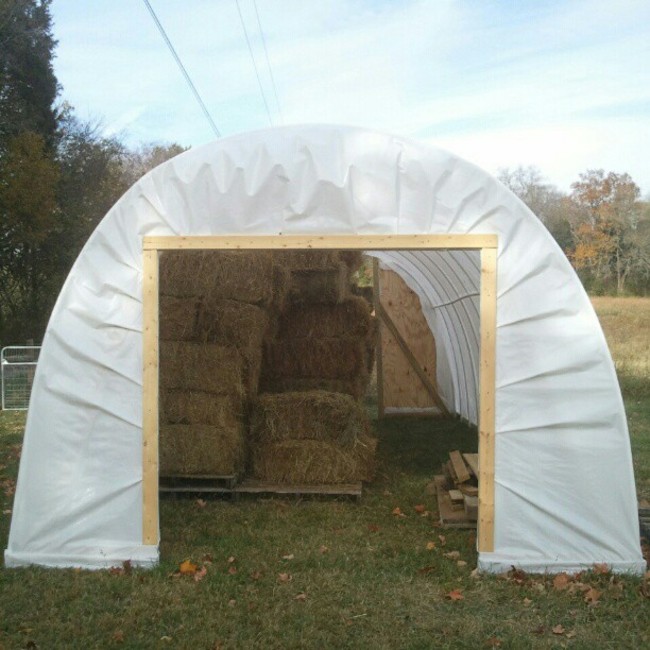
The hoop house is basically done at this point. All that's left is the end-walls, if you want to add them. We faced our structure North/South and just past a tree line on the West, so it's very well protected from storms and shouldn't get much rain in and out of the end-walls. But we put up some small end-walls anyway for those occasional Southernly storms and the once-in-a-blue-moon Northerly storms. We did not put on doors. I've found with all of our out-buildings if you can get away with not having doors then it makes life much easier (and cheaper). Just beware of rogue goats raiding open barns.
For one end-wall we pulled plastic over a 2x4 frame and sandwiched it around the frame using furring strips (seen in the picture below). On the other side we used sheets of plywood covered in plastic. I'm not sure which I liked better, they both seem fine. Adding the 2x4 end-wall frame added a lot of stability, which is probably worth doing even if you don't 'want' end walls.
In general the structure appears very strong. Surprisingly strong, actually. I was totally surprised and figured it would be wobbling and blowing back and forth in even the slightest wind. Thus far I haven't even seen it budge and we've had some strong winds pass through from Sandy and other storms.
It was fun to build and I am sure we'll build another one to use as a greenhouse once we get everything else up and running. Building a smaller greenhouse would be a breeze and you could probably get it down to $200.
 Finished Hoop House. The curvature of the building makes stacking hay difficult... should've anticipated that before I put up 100 bales
If anyone's interested I can post more photos, just let me know in the comments.

